ALL OF THE PROJECTS THAT I DEVELOP ARE STILL PROVIDED ON MY WEBSITE FREE OF CHARGE (WITH NO INTRUSIVE ADS OR POP-UPS).
WINAMP HELP
2. The Winamp Media Player
2.1 Using the Winamp Media Player
As in previous versions, The Winamp Player is a flexible and sophisticated application for playing and managing your music. With the latest release, the player is easier than ever to use with a new, powerful and intuitive interface.
The screenshot below is of Winamp with the Winamp Modern skin active.
Point to a part of the image to learn more about each part of the Winamp interface:

The screenshot below is of Winamp with the Big Bento skin active.
Point to a part of the image to learn more about each part of the Winamp interface:

2.2 Playing MP3 Files
MP3 is the most popular for music on the Internet because its small size and high quality.
To play an MP3 file, do one of the following:
- Drag a file from a folder on your computer to the Winamp main window.
- Click the Open File(s) button
") and select a file on your computer.
and select a file on your computer. - Open the File menu and click Open File.
2.3 Playing Audio CDs
To play a CD
- With Winamp open, insert a CD into your computer's CD-ROM drive.
If you have made Winamp the default player for audio CDs in the Winamp preferences, the CD should play automatically. - In case the CD doesn't automatically play, open the File menu and click Play Folder.
The Open Folder window appears. - Select the CD-ROM drive that contains your audio CD and click OK.
Other methods of playing Audio CDs
- Or use: Main Menu --> Play --> Audio CD X:
The main menu is accessible via the top left-corner icon, or by right-clicking the frame.Note
This method is required for playing Enhanced CDs.
- Or type the following into the Add/Open URL dialog: cda://X (where "X" is the CD Drive letter)
- Or open the Media Library, go to your CD Drive listed under Rip & Burn, and click one of the 'Play or Enqueue buttons.
Note
If you are connected to the Internet, Winamp will connect to the CDDB database to find matching CD information.
2.4 Ripping CD Tracks to Your PC
Want to have your CDs available on your computer? Winamp lets you rip (transfer and compress digitally) your CDs to your computer hard drive. This means you can listen to them without having to pop in the CD. It also means you can create your own playlists using individual tracks from different albums.
Note
Before ripping tracks to your computer, you should first configure the CD ripping settings. For more information, see Library Preferences: CD Ripping.
To rip CD tracks to your computer hard drive
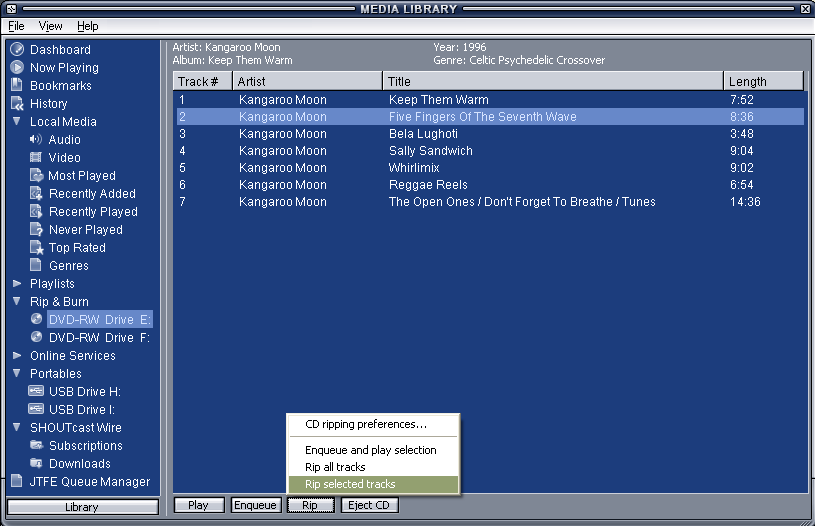
Insert a CD that has tracks you want to transfer to your computer hard drive. Open the View menu in the Winamp main window and click Media Library.
- On the left side of the Media Library, click on your CD drive within the Rip & Burn list.
- You may have to double-click Rip & Burn to see your list of CD/DVD drives.
- If you don't see the Rip & Burn node, then go to: Winamp -> Preferences (Ctrl+P) -> Media Library -> Tree Options tab and checkmark "Group CD Drives under the 'Rip & Burn' parent" A numbered list of tracks appear in the track list on the right.
- CDDB will automatically fill in the Titles, but if you wish to manually edit any of the CD Information first, right-click anywhere in the window, and select Edit CD Info.
- If you want to rip some of the tracks on your CD, select the tracks you want to rip in the track list. You can keep Ctrl pressed down to select more than one track.
- Open the Rip menu and click one of the following:
- Rip selected tracks: Click this to rip the tracks currently selected in the track list.
- Rip all tracks: Click this to rip all of the tracks on your CD, regardless of the currently selected tracks.
- The status window appears to show you track ripping progress and speed.
- When done, the ripped tracks will be available in your Local Media views (Audio, Recently Added, etc) and will be physically located within the folder you specified in the CD Ripping Preferences.
For further in-depth information, a full comprehensive CD Ripping Tutorial by Gaekwad2 can be found in the Winamp Forums.
2.5 Burning Tracks to CDs
Winamp makes the joy of burning (creating) your own music CDs even easier with built-in CD burning. Add individual tracks, a folder, or just burn the playlist you're listening to right now.
To burn tracks to an Audio CD:
- Insert a blank CD-R or CD-RW into your computer's CD Recorder.
- Open the View menu in the Winamp main window and select Library (or press ALT+L) to launch the Media Library.
- On the left pane of the Media Library, select your CD recorder within the Rip & Burn list. CD/DVD-RW Drives will be identified as: CD Recorder
e.g. CD Recorder (E:) Note
You may have to double-click Rip & Burn to see your list of CD/DVD-RW drives. If you don't see the Rip & Burn node, then go to: Winamp -> Preferences (Ctrl+P) -> Media Library -> Tree Options tab and checkmark "Group CD Drives under the 'Rip & Burn' parent"
- You can queue tracks to burn in the following ways:
- Add menu in Burn view: Open the Add menu and click one of the following:
- Files: Click this to add one or more files. You can keep CTRL pressed down to select more than one file.
- Folder: Click this to add all the files in a folder.
- Current Playlist: Click this to add the tracks in your current playlist.
Note
As you add tracks to burn, the used and available time is displayed above the list. Make sure you do not exceed your blank disc's capacity.
- Drag and Drop
- Select a file or group of files (press CTRL or Shift to select individual or group of files when clicking on desired items) from the Local Media views
- While pressing the left mouse button, drag and drop the selected files onto your CD recorder device
Note
You can also add files by right-clicking Local Media or Playlist entries, and using the Send To submenu (eg. Send To > CD Burner on X:)
- Burning Playlists
- Using the Playlist view of the Media Library, create a new playlist or import an existing playlist.
- Switch to that playlist by clicking it in the left pane of the Media Library.
- Click the Burn button located within the Playlist view.
Note
This action will queue all the playlist items into the CD Recorder view. The Media Library should automatically switch you to the Recorder view.
- Add menu in Burn view: Open the Add menu and click one of the following:
- You can rearrange the Track Order by dragging selected items up and down the list, or by right-clicking and selecting 'Move selected items up/down'. Similarly, You can remove undesired tracks from the Burn List by using the Del key, or by right-clicking and selecting 'Remove selected items'.
- Click Burn when you are done adding tracks to the list. The final dialog box for burning appears.
- Choose from the following options:
- Burn speed: Use the drop-down list to select the speed at which you want to burn your tracks. If you have Winamp Pro, you can select the maximum speed that your CD recorder allows.
- Enable burn-proof mode: Select this to help ensure that CD burning doesn't fail.
- Test mode: Select this to do a test burn that doesn't actually affect the CD.
- Click Burn to start burning your tracks to CD.
2.6 Skinning Winamp
Winamp5 uses the same, ever-lovin' skinning engine available in the Winamp2 versions of the player. But fear not. You can also use free-form skins designed for Winamp3.
To change skins
- From the Options menu, open Apply Skin and choose a skin from the list of available skins.
To get more skins
By default Winamp uses the Modern skin, but you can choose among countless skins available online:
- Classic and Modern skins: Winamp Skins Gallery
To create your own skin:
With some design and programming skills, you can create your own skin that will change Winamp's appearance the way you want. More information about creating skins can be found in the dedicated Winamp Developer Section.
Tip
If you are a master of the right-click, you can right-click on the Winamp main window and get to the Skins menu.
2.7 Winamp Playlists
2.7.1 Loading Playlists
A playlist lets you keep a list of tracks to play whenever you want. You get to keep your choice and order of tracks.
To open the Playlist Editor
- Open the Main or View menu and select Playlist Editor.
To load a playlist
- Open the File menu and click Open Playlist.
To load a playlist from the Media Library
- Click the Manage Playlist button and select Open Playlist from Media Library.
- Or for Classic skins you can right-click the List Opts button to access the same menu.
- Or right-click on the frame or any blank space in the Main or Playlist windows (or use the Main menu from the top left corner icon) and select Play > Playlist from Media Library.
- Or open the Media Library window, and load a playlist via the Playlists view.
2.7.2 Playlist Editing
The Winamp playlist organizes your music files, your videos, favorite internet radio stations and all of your media resources into a single, intuitive interface. If you are using Winamp for the first time, then the playlist may be empty. You can edit your playlist in any of these ways:
Add Button: Click this button for track addition options.
- Add files(s): Add files from your computer to the current playlist.
- Add directory: Add a directory on your computer to the current playlist.
- Add location: Add an Internet location to the current playlist.
Rem (Remove) Button: Click this button for removal options.
- Remove selected files: Remove the selected tracks from the current playlist.
- Crop selected: Only keep the selected tracks, while removing others.
- Clear playlist: Remove all the tracks in the current playlist.
- Remove...
- Remove all dead files: Remove tracks that have missing, moved, or deleted files.
- Physically remove selected file(s): Delete selected tracks from your computer.
Caution
Using this option will permanently remove the selected tracks from your computer and they will be irrecoverable.
- Remove duplicate entries: Remove any multiple entries of the same file.
Sel (Select) Button: Click this button for selection options.
- Select all: Select all of the tracks in the current playlist.
- Select none: Select none of the tracks in the current playlist.
- Invert selection: Select all of the unselected tracks in the current playlist, and clear the selected tracks.
Misc (Miscellaneous) Button: Click this button for miscellaneous options.
- File Info
- File info: Display detailed information about the selected track.
- Playlist entry: Change the file location associated with the select track.
- Sort
- Sort list by title: Sort the playlist by title.
- Sort list by filename: Sort the playlist by the filename of each track.
- Sort list by path and filename: Sort the playlist first by path and then by filename.
- Reverse list: Reverse the current order of the playlist.
- Randomize list: Shuffles up the current order of the playlist.
- Misc
- Generate HTML playlist: Create an HTML version of the current playlist.
- Read extended info on selection: Read any additional information from the ID3 tag for the selected track.
Manage Playlist (Miscellaneous) Button: Click this button for list-related options.
- Open playlist: Open a saved playlist.
- Open Media Library view results: Open a Local Media view from the Media Library.
- Open playlist from Library: Open a playlist saved in the Media Library.
- Save playlist: Save the current playlist.
- New playlist (clear): Clear the current playlist.
- Manage Playlist: Open the Playlists panel of the Media Library.
2.7.3 Saving Playlists
Once you've got the tracks you want in your playlist, make sure you save it for future generations.
To save a playlist
- Open the File menu and click Save Playlist.
The Save Playlist dialog box opens. - Choose a folder where you want to save your playlist.
- In the File name field, type a name for your playlist.
- In the Save as type drop down list, choose M3U Playlist or PLS Playlist. M3U is fine in most situations. If your playlist contains international (unicode) titles, then you should select M3U8 Playlist.
- Click Save to save your playlist.
To save a playlist in the Media Library
- Open the Media Library and click Playlists in the left pane.
- Click the Import button at the bottom of the right pane.
- Select one of the following three options:
- Import playlists from folder
- Import (active) current playlist
- Import playlist from file
- The imported playlists appear in the list above.
2.7.4 Searching Your Playlist
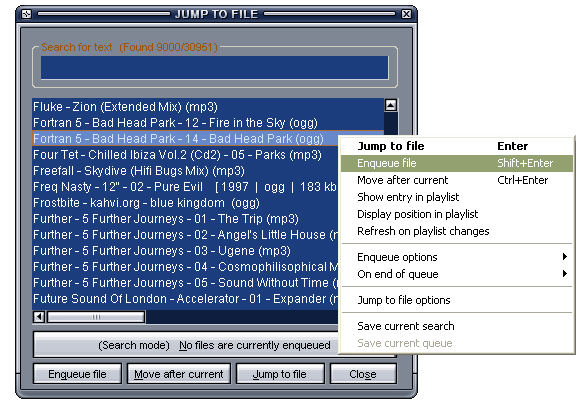
Searching with Jump to File:
To search a large playlist, whilst the Playlist Editor window is in focus, hit the 'J' or 'F3' key on your keyboard to open the 'Jump to File' dialog. The entire playlist will initially appear in the search results, and will be filtered-out as you type into the Search field.
Tip
By default, the search results will match any of the Artist, Title and containing Folder criteria. To fetch results for Album or any other fields from the file tags, first you will need to adjust your Advanced Title Formatting syntax for the Playlist Editor accordingly.
Note
The JTF dialog can be configured to taste via the Jump to File Options.
Queueing songs to be played next:
To queue up a song in the Playlist Editor, either highlight the playlist entries and press the 'Q' key, or hold down the Alt key and left-click your selection, or right-click one of the selected entries and click 'Enqueue selected' via the 'Jump to File' submenu.
Note
You can manage the Queue via the "Enqueue List" page in the Jump to File Options, or via the "Jump to File" dialog (see screenshot below). Click the large "Search mode" button to switch the dialog to "Manage mode".
Using 'Jump to File' to Queue Songs: